Display Payment UI
There are a couple of decisions to be made when presenting your payment UI. You have the choice between a payment menu with all payment methods you want to offer, or with a single available payment method using instrument mode.
Regardless of the number of payment methods available to the payer, you also
need to choose between Redirect and Seamless View.
With Redirect, the payer is sent to a Swedbank Pay page where we handle the
purchase process. The payer is redirected back to you when the purchase is
completed or if the payer aborts the purchase. The page will be styled by
Swedbank Pay.
With Seamless View, the payer stays at your site and you initiate the
Swedbank Pay purchase module in an iframe. The purchase component will be styled
by Swedbank Pay.
Read about how you integrate them in the corresponding sections.
Display Redirect
Among the operations in the POST paymentOrder response, you will find
redirect-checkout. This is the one you need to display the payment UI.
Response
1
2
3
4
5
6
7
8
9
10
11

{
    "paymentOrder": {}
    "operations": [
        {
            "method": "GET",
            "href": "https://ecom.externalintegration.payex.com/checkout/6445a0d8d9a7f80a37f4e46fc600a0534a832e4b6ec0dbb6768dd362d9401a8b?_tc_tid=30f2168171e142d38bcd4af2c3721959",
            "rel": "redirect-checkout",
            "contentType": "text/html"
        },
    ]
}
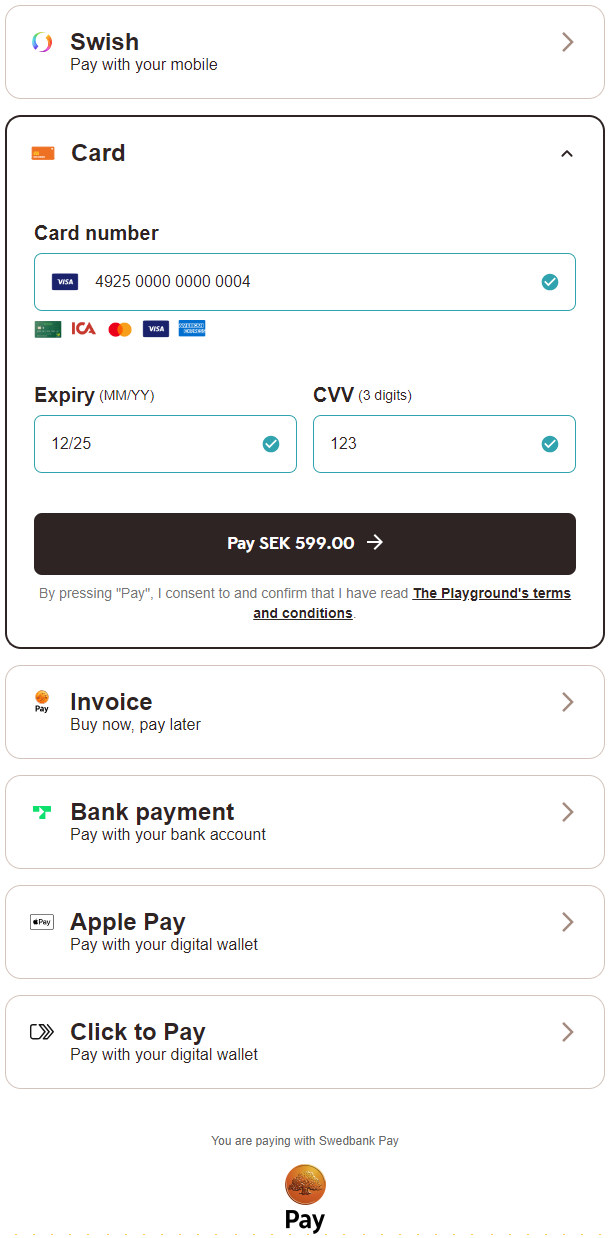
How Redirect Looks
We strongly advice against displaying the redirect page inside of an iFrame. If you need to be able to show the checkout page on your site, rather than redirecting to our page, we recommend you implement the Seamless View solution instead.
With the link, you only need to redirect the payer to the site to give them the option to select their preferred payment method to pay with.
Once the payer has completed the purchase, you can perform a GET towards the
paymentOrders resource to see the purchase state.
Redirect Sequence Diagram
Note that in this diagram, the Payer refers to the merchant front-end (website) while Merchant refers to the merchant back-end.
sequenceDiagram
participant Payer
participant Merchant
participant SwedbankPay as Swedbank Pay
participant 3rdParty

rect rgba(238, 112, 35, 0.05)
    activate Payer
    Payer ->>+ Merchant: Initiate Purchase
    Merchant ->>+ SwedbankPay: POST /psp/paymentorders (completeUrl, payer information)
    SwedbankPay -->>- Merchant: rel:redirect-checkout
    Merchant -->>- Payer: Redirect payer to SwedbankPay purchase page.
    Payer ->> Payer: Initiate Purchase step
    Payer ->>+ SwedbankPay: Do purchase logic
    activate SwedbankPay

    opt Payer perform purchase out of iFrame
        SwedbankPay ->>- Payer: Redirect to 3rd party required
        Payer ->>+ 3rdParty: Redirect to 3rdPartyUrl URL
        3rdParty -->>- Payer: Redirect back to SwedbankPay
        Payer ->> Payer: Initiate Payment Menu
        Payer ->>+ SwedbankPay: Show Purchase UI page in iframe
    end

    SwedbankPay -->>- Payer: Purchase status

    alt If Purchase is completed
        Payer ->> Payer: Redirect back to CompleteUrl
        Payer ->>+ Merchant: Check Purchase status
        Merchant ->>+ SwedbankPay: GET <paymentorder.id>
        SwedbankPay ->>- Merchant: Status: Paid
    end

    Merchant -->>- Payer: Show Purchase complete
    deactivate Payer

    opt PaymentOrder Callback (if callbackUrls is set) ①
        SwedbankPay ->> Merchant: POST Purchase Callback
    end
end

rect rgba(81,43,43,0.1)
    note right of Payer: Capture
    Merchant ->>+ SwedbankPay: rel:capture
    SwedbankPay -->>- Merchant: Capture status
    note right of Merchant: Capture here only if the purchased<br/>goods don't require shipping.<br/>If shipping is required, perform capture<br/>after the goods have shipped.<br>Should only be used for <br>Payment Methods that support <br>Authorizations.
end
- ① Read more about callback handling in the technical reference.
Redirect - Next Steps
You are now ready to validate the payment’s status. Follow the link below to read more about how this is done.
Display Seamless View
Among the operations in the POST paymentOrder response, you will find the
view-checkout. This is the one you need to display the purchase module.
Response
1
2
3
4
5
6
7
8
9
10
11

{
    "paymentOrder": {},
    "operations": [
        {
            "method": "GET",
            "href": "https://ecom.externalintegration.payex.com/checkout/client/1c168a5f971f0cacd00124d1b9ee13e5ecf6e3e74e59cb510035973b38c2c3b3?culture=sv-SE&_tc_tid=123a825592f2002942e5f13eee012b11",
            "rel": "view-checkout",
            "contentType": "application/javascript"
        },
    ]
}
Load the Seamless View
To display the UI, we need to take the href from the POST request and add
it to a script element on the webpage. Once the script has loaded in, we can
then use the payex.hostedView.checkout().open() function on the clientscript
to show the menu.
There are a few parameters we can set to further customize the menu itself, which are shown in the example below. This includes the place we want to open up the menu (container), the language we want the menu to display (culture), and any events we want to override.
JavaScript
1
2
3
4
5
6
7
8
9
10
11
12
13
14
15
16
17
18
19
20
21
22
23
24

// For this example, we'll be simply adding in the view-checkout link right in
// the script. In your own solution, it's recommended that your backend
// generates the payment and passes the operation to your frontend.
const url = new URL("https://ecom.externalintegration.payex.com/checkout/client/1c168a5f971f0cacd00124d1b9ee13e5ecf6e3e74e59cb510035973b38c2c3b3?culture=sv-SE&_tc_tid=123a825592f2002942e5f13eee012b11");

const script = document.createElement("script");
script.src = url.href;
script.type = "text/javascript";
script.id = "payex-checkout-script";
script.onload = function() {
    payex.hostedView.checkout({
        // The container is the ID of the HTML element you want to place
        // our solution inside of.
        container: {
            checkout: "payex-checkout"
        },
        culture: "sv-SE",
        // This is where you can add your own seamless events.
        // See the section "Events" down below for more information.
        onError: Function = (data) => console.error("onError", data),
        onEventNotification: Function = (data) => console.log("onEventNotification", data)
    }).open();
}
document.body.insertAdjacentElement("afterbegin", script);
HTML
1
2
3
4
5
6
7
8
9
10
11

<!DOCTYPE html>
<html>
    <head>
        <title>Swedbank Pay Checkout is Awesome!</title>
    </head>
    <body>
        <div id="payex-checkout"></div>
        <!-- Here you can specify your own javascript file -->
        <script src="<Your-JavaScript-File-Here>"></script>
    </body>
</html>
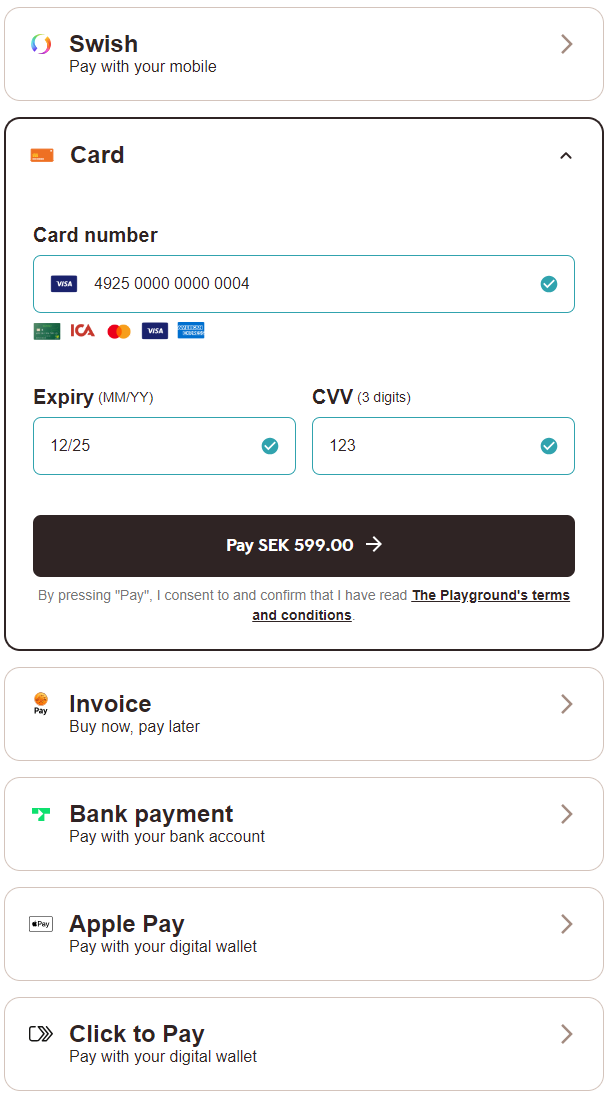
How Seamless View Looks
After opening up the client script, the menu itself will load inside of an iframe in the container you provided us earlier. From here, the payer can select their preferred payment method and pay.
Once the payer completes their purchase, you can then perform a GET towards the
paymentOrders resource to check the purchase state.
Seamless View Events
When you integrate using the Seamless View implementation, you can override one or more of our Seamless View events. This ranges from changing what happens when the payer completes or cancels their payment, to when we resize the payment menu itself. While optional, this gives you more flexibility and control over the payment flow, during and after the payer completes and/or cancels their payment attempt.
Events like onPaid allows you avoid redirecting to the completeUrl once
the payer completes or cancels the payment. This allows you to check the
payment, or just close the payment window and display a receipt on the same
page. Other events like onPaymentAttemptFailed can allow you to keep tabs on
the amount of failed attempts, for example if you want to show a warning or
a message if the payer is unable to complete a payment after several tries.
For the full list over the different events you can override, check out the Seamless View Events page, also available in the feature section.
Seamless View Sequence Diagram
Note that in this diagram, the Payer refers to the merchant front-end (website) while Merchant refers to the merchant back-end.
sequenceDiagram
participant Payer
participant Merchant
participant SwedbankPay as Swedbank Pay
participant 3rdParty

rect rgba(238, 112, 35, 0.05)
    activate Payer
    Payer ->>+ Merchant: Initiate Purchase
    Merchant ->>+ SwedbankPay: POST /psp/paymentorders (hostUrls, paymentUrl, payer information)
    SwedbankPay -->>- Merchant: rel:view-checkout
    Merchant -->>- Payer: Display SwedbankPay Checkout on Merchant Page
    Payer ->> Payer: Initiate Purchase step
    Payer ->>+ SwedbankPay: Do purchase logic
    activate SwedbankPay

    opt Payer performs purchase out of iFrame
        SwedbankPay ->>- Payer: Redirect to 3rd party required
        Payer ->>+ 3rdParty: Redirecting to 3rd party URL
        3rdParty -->>- Payer: Redirect back to paymentUrl (merchant)
        Payer ->> Payer: Initiate Checkout Seamless View (open iframe)
        Payer ->>+ SwedbankPay: Check purchase status
    end

    SwedbankPay -->>- Payer: Purchase status
    deactivate SwedbankPay

    alt If the purchase is completed
        Payer ->>+ SwedbankPay: GET <paymentorder.id>
        SwedbankPay ->>- Payer: Status: Paid/Failed
        Payer ->> Payer: Show Purchase complete
        Payer ->> Payer: Event: onPaid ①
        note right of Payer: Unless you override OnPaid, this will<br/>cause a redirect to the CompleteUrl
    else If the purchase attampt has failed
        Payer ->>+ SwedbankPay: GET {paymentorder.id}
        SwedbankPay -->>- Payer: Payment Status: Failed
        Payer -->> Payer: Display error message in the Payment UI
        Payer ->> Payer: Event: onPaymentAttemptFailed ①
    end

    opt PaymentOrder Callback (if callbackUrls is set) ②
        SwedbankPay ->> Merchant: POST Purchase Callback
    end

    deactivate Payer
end

rect rgba(81,43,43,0.1)
    note right of Payer: Capture
    Merchant ->>+ SwedbankPay: rel:capture
    SwedbankPay -->>- Merchant: Capture status
    note right of Merchant: Capture here only if the purchased<br/>goods don't require shipping.<br/>If shipping is required, perform capture<br/>after the goods have shipped.<br>Should only be used for <br>payment methods that support <br>Authorizations.
end
- ① See seamless view events for further information.
- ② Read more about callback handling in the technical reference.
Change From Seamless View To Redirect UI
As parts of the PCI-DSS best practice becomes requirements with PCI-DSS v4 active from April 2025, using the Seamless View integration to display the payment UI will give merchants more responsibilities than they currently have. This is because Seamless View is hosted by you. As the Redirect integration is hosted by Swedbank Pay, we also handle these responsibilities.
The updated requirements will include stricter controls and monitoring, particularly around the security of your checkout process. Merchants are responsible for ensuring the integrity of the HTML script used in their integration, including monitoring what is loaded into or over it. Specifically, Seamless View merchants must verify that the script URL embedded in their iframe originates from Swedbank Pay or another trusted domain. It is important to note that Swedbank Pay’s PCI responsibility is strictly limited to the content within the payment iframe.
For further details, refer to section 4.6.3 and 11.6.1 in the linked PCI-DSS document.
Please note that this only applies to payment methods that are affected by PCI-DSS (Card and Click to Pay). If you only offer payment methods not affected by PCI-DSS, no actions are necessary. If you want to add PCI-DSS affected payment methods later, this is something you need to consider.
To learn more about how PCI-DSS affects you, we also have reading available in Danish, Finnish, Norwegian and Swedish.
If you currently have a Seamless View integration and don’t want the new responsibilities, switcing to Redirect is a very manageable task. Here’s what you need to do:
Use Redirect Operation
In the operations node of the payment response, right next to
view-checkout which you should currently be using, you’ll find
redirect-checkout. The corresponding href contains a url which leads to a
Swedbank Pay domain where the payment UI will be displayed and processed. All
you need to do is direct the Payer to this url and wait until one of the
functions are called (completeUrl, cancelUrl or callbackUrl) to proceed
with the payment process.
Redirect-Checkout Operation
1
2
3
4
5
6
7
8
9
10

{
    "operations": [
        {
          "method": "GET",
          "href": "https://ecom.externalintegration.payex.com/payment/menu/b934d6f84a89a01852eea01190c2bbcc937ba29228ca7502df8592975ee3bb0d?_tc_tid=30f2168171e142d38bcd4af2c3721959",
          "rel": "redirect-checkout",
          "contentType": "text/html"
        },
    ]
}
Remove Seamless View Code
You can remove all code related to the <script> element used to load the
Seamless View.
Change URLs
Finally, you need to do some changes to the urls node in your
payment request. The paymentUrl field is specific to Seamless
View and can be removed.
The url you need to add is the cancelUrl, so we know where to redirect the
payer if they chose to cancel, or you chose to abort the payment.
If you have permission to add your own logo in the payment UI and
want to add one, you also need to include a logoUrl. Follow the guidelines in
the section linked above. If no logoUrl is added, Swedbank Pay’s logo will be
shown by default.
The completeUrl, hostUrls and callbackUrl is universal and must be
included regardless of your UI choice.
Seamless View Specific URL
1
2
3
4
5

{
        "urls": {
            "paymentUrl": "https://example.com/perform-payment"
        }
}
Redirect Specific URLs
1
2
3
4
5
6

{
        "urls": {
            "cancelUrl": "https://example.com/payment-cancelled",
            "logoUrl": "https://example.com/logo.png" //Optional
        }
}
Monitoring The Script URL
You must confirm that your site is not susceptible to attacks from scripts that could affect the merchant’s e-commerce system(s).
Seamless View - Next Steps
You are now ready to validate the payment’s status. Follow the link below to read more about how this is done.